 by theygames
How do you complete Destiny 2 Salvation’s Edge raid? This tricky raid is stumping even the most experienced raiders. There’s no shame in seeking a little helping hand, especially if you want to get it finished within contest mode. We’re working our way slowly through it ourselves too, so this guide is a work in progress.
Destiny 2 has long been famed for its raid races, which sees fireteams of six gather together to try to complete the raid on “day one” which recently became two days to encourage Guardians to stay healthy, get rest, and not stick to their desks for 24 hours straight. With the complexity of Salvation’s Edge, this one could well take the full 48 hours to finish, even if you’ve got the best Prismatic build around.
Substratum guide
This section will detail the first encounter, which you can reach after a short traversal section from the landing zone. We’ll detail that including the secret and red-border chests when we update this guide after contest mode ends.
The first proper encounter in Salvation’s Edge has several mechanics. You’ll want to split into two teams of three and take a different opening door each to begin with, designating one person to plates, one person to the initial pyramid collection, and one person to crowd control.
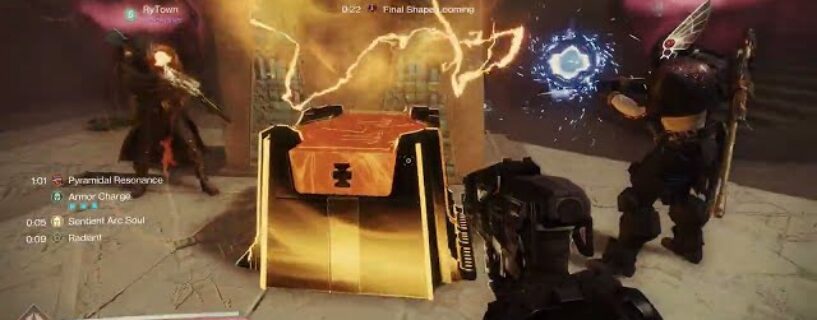
To begin the encounter ensure everyone is in the main room, pick up the Pyramidal Triangle, and deposit it into the nearby box which reads “Deposit Resonance,” which will then despawn.
Two doors will open, stay clear to begin with as Supplicants will spawn, track towards you, and explode. You’ll also notice that a timer will begin counting down at the top of your HUD which says “Final Shape Looming.” When this counter reaches zero, the entire team will wipe.
Head into the rooms and kill enemies as quickly as possible. You’ll need follow this pattern:
- Kill a Hydra to open another door on the opposite side
- Kill a Minotaur to spawn an Overload on the opposite side
- Kill an Overload champion to spawn a Tormentor in the center room
- Head to the center room and take down the Threshold Sentinal Tormentor to open more doors
After completing the above cycle twice, break up into your teams and seek out a glowing plate to stand on. Stepping on the plate will send a beam of light along the currents marking the walls and floors to another plate. A second player should step on the plate that glows next. The current will then be bounced back to the original plate. Repeat this process, bouncing the current back and forth. While this is happening, enemies will spawn in the plate rooms. Make sure you aid your teammates in taking these down as quickly as possible.
If you’re bouncing the current back correctly, Pyramidal Resonance triangles will spawn in both plate rooms and the center room. Every player should try to collect three of these. Keep bouncing the charge as long as possible until you have collected enough of the triangles.
After collecting as much Pyramidal Resonance triangles without letting the timer deplete beyond around 40 seconds, have one person shoot the glowing triangle in the pillar near the plate. If you have been successful, it will glow. Step on the plate a final time and shoot the triangle to lock it. You will see a message that reads “The resonant conductor sparks to life.” Once both pillars are locked, head to the center room where a Harbinger of the Witness will spawn. Kill it to conjure a box in the same room and deposit your stacks of Pyramidal Resonance. This will extend the timer, and you should repeat the entire above process until you’ve deposited around 45 Pyramidal Resonance. That’s the first encounter cleared.
Herald of Finality guide
This second encounter comes after another traversal section that we will detail after contest mode ends. The Herald of Finality is the first boss encounter that you will face during the raid. You’ll enter a wide open arena with a rectangular field in the middle and three Resonance Conduit pillars with plates on the left, right, and near side (L, R, N). You’ll want to assign two players to each pillar. You will now notice there is Pyramidal Resonance as in the first encounter, but also Spherical Resonance.
Shoot the Taken blights to start the encounter. The boss will spawn alongside Taken and Dread enemies. Yellow bar Taken Knights and orange bars will spawn on each side. If any of these enemies step on the plates your fireteam will wipe. The Final Shape Looming counter is also back.
Killing orange bar enemies will spawn three Taken blights around the center. One person from each pair will get the Beckoned to Fight buff and should run forward to destroy the Blights and collect the Call for Reckoning buff. When enough Blights have been destroyed, a new smaller Blight will appear above the boss. If you have the Call for Reckoning buff, you can shoot this to convert it into a different buff called Stolen Valor. You can then use this to run back to the pillar and read which type of resonance needs to be deposited into each.
Bounce the energy between the plates when you notice them glowing, as you did in Substratum. One person on each pillar should collect a different type of resonance. Make sure to lock the pillars, as you did in Substratum, in order for the next phase to begin.
After locking the pillars, the box will spawn in the center for the resonance to be deposited. Dunk everything to add time to the Final Shape Looming timer. When the box vanishes, the boss’s shield will be lowered and you should do as much damage as possible before he goes immune again. Repeat this until the final stand, where more ogres will spawn to make the final damage phase more difficult.
Third encounter walkthrough
To be confirmed…
See Beyond walkthrough
This puzzle has the most prestigious Destiny 2 streamers stumped for over five hours at the time of writing. As soon as they, or we, figure it out, we’ll add detailed instructions here.
This guide is a work in progress and will continue to be updated as we clear more encounters. While we’re in contest mode, we’re heads down trying to get everything completed, so we’ve included reputable streamers’ videos to illustrate. This will be updated with our own clear videos once we’ve achieved those.